- 29 November 2017
- News
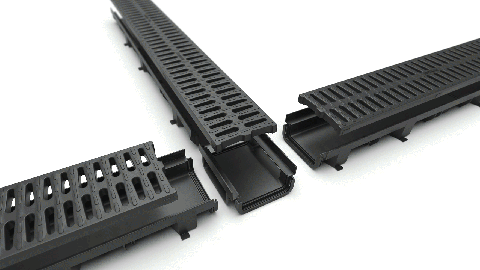
Installation outdoor drains
The body of the drain off ers ready (preformed) holes for subsequent connections.
The holes can be opened with a hammer but only if the grid is installed in the drain. This will prevent damage to the drain. After hammering out the opening it can be cleaned up with a fi le. You can use up to four side pre-prepared holes for the installation of pipes size DN 50. The Bottom hole can be opened in the same way. You can also connect sewer pipes size DN 110.
RECOMMENDATIONS FOR USE OF CONCRETEStrength class is one of the basic parameters of concrete.
Concrete of ordinary strength grades are commonly available in concrete plants. Individual schemes set the parameters that the concrete must meet to be resistant to its immediate environment throughout its lifetime.
StrengthclassType
ALCAClasses C12/15HOME
HOME+A15 C20/25STANDARDB125 C30/37PROFIC250 C30/37TOPD400 AVZ101-R101
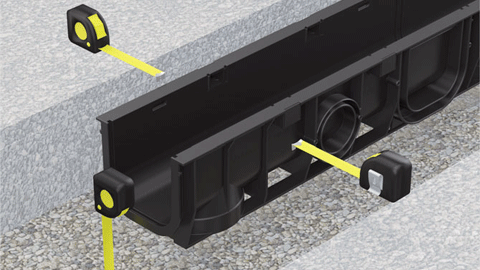
Provide suffi cient space not only for the drain, but also for the required concrete bed.
Choose the location of the outlet (lowest position), the beginning and end of the line. The minimum height of the concrete slab is 10 cm.
Adjust the height so as to achieve a downward slope. Install the drains with the grids in them, to prevent deformation of the body during concrete hardening. To avoid the grids from getting dirty and contaminated, we recommend that you cover them in PVC foil.
The surrounding surface should be permanently 3 – 5 mm above the top surface of the drain cover. In the case of concrete paving for frequently used surfaces, we recommend at least that the ones in areas close to the drain to be fixed into a concrete bed.
AVZ102-R102Provide suffi cient space not only for the drain, but also for the required concrete bed.
Choose the location of the outlet (lowest position), the beginning and end of the line. The minimum height of the concrete slab is 10 cm.
Adjust the height so as to achieve a downward slope. Install the drains with the grids in them, to prevent deformation of the body during concrete hardening. To avoid the grids from getting dirty and contaminated, we recommend that you cover them in PVC foil.
The surrounding surface should be permanently 3 – 5 mm above the top surface of the drain cover. In the case of concrete paving for frequently used surfaces, we recommend at least that the ones in areas close to the drain to be fixed into a concrete bed.
AVZ102-R103Provide suffi cient space not only for the drain, but also for the required concrete bed.
Choose the location of the outlet (lowest position), the beginning and end of the line. The minimum height of the concrete slab is 10 cm.
Adjust the height so as to achieve a downward slope. Install the drains with the grids in them, to prevent deformation of the body during concrete hardening. To avoid the grids from getting dirty and contaminated, we recommend that you cover them in PVC foil.
The surrounding surface should be permanently 3 – 5 mm above the top surface of the drain cover. In the case of concrete paving for frequently used surfaces we recommend to proceed according to the diagram below.
AVZ103-R104Provide suffi cient space not only for the drain, but also for the required concrete bed.
Choose the location of the outlet (lowest position), the beginning and end of the line. The minimum height of the concrete slab 15 cm. Into the concrete slab insert reinforcing steel Ø10 mm, every 40 cm.
Adjust the height so as to achieve a downward slope. To avoid deformation during installation the drains come with, metal strips which, after concreting are to be removed.
The surrounding surface should be permanently 3 – 5 mm above the top surface of the drain cover. The drain’s entire height must be cemented. Width (thickness) of the side of the concrete layer is recommended at least 15 cm.
AVZ103-R201Provide suffi cient space not only for the drain, but also for the required concrete bed.
Choose the location of the outlet (lowest position), the beginning and end of the line. The minimum height of the concrete slab is 20 cm. Into the concrete slab insert reinforcing steel Ø10 mm, every 40 cm.
Adjust the height so as to achieve a downward slope. To avoid deformation during installation the drains come with, which, after concreting are to be removed.
The surrounding surface should be permanently 3 – 5 mm above the top surface of the drain cover. The drain’s entire height must be cemented. Width (thickness) of the side of the concrete layer is recommended at least 20 cm.